December's
SLP:Cheerful Theme:Celebrate
Interest Topic: Campfire Etiquette
January's SLP:Obedient Theme:Cub Scout City Council Interest Topic: Cub Scout Camping
January's SLP:Obedient Theme:Cub Scout City Council Interest Topic: Cub Scout Camping
Opening
Brain Teaser - This would be a great thing to write on the chalk or
white board for boys and parents to have something to think about while they
wait for everyone to arrive at a Pack or Den Meeting. (An idea you could use would be to reward the
cub scouts a piece of candy if they get it right).
ONE TOO MANY - Use Basic Math functions (+, -, x, division)
with the digits 0,1,2,3,4,5,6,7,8 and 9 so that you get a result of 1. All
digits must be used but only once.
*Answer is at the end of this section. (scroll down)
(Brain Teaser taken from: The Little Black Book of Mindbenders by John Samson and Elsie Samson; pg. 46)
*Answer is at the end of this section. (scroll down)
(Brain Teaser taken from: The Little Black Book of Mindbenders by John Samson and Elsie Samson; pg. 46)
Gathering
Activity Idea #1
Camping Word Search
Click here to print off a copy of the word search:https://drive.google.com/open?id=0B0revQcSgs4OZm0yYXBIT1BmLXM
Click here to print off a copy of the answers to the word search:https://drive.google.com/open?id=0B0revQcSgs4OYTFRZlhvZ09UR2s
Camping Word Search
Click here to print off a copy of the word search:https://drive.google.com/open?id=0B0revQcSgs4OZm0yYXBIT1BmLXM
Click here to print off a copy of the answers to the word search:https://drive.google.com/open?id=0B0revQcSgs4OYTFRZlhvZ09UR2s
Note: To have the image of these links print off in "landscape' format, you will need do the following: 1ST STEP-Click on the picture of the printer- upper right-hand corner / 2ND STEP- Click on "Properties / 3RD STEP-Click on the IMAGE of the paper format
(This has a big blue E and a colored graph on it above the "Paper
Sizes" drop down menu). Note: Be sure to reset it back to "Portrait"
when you are done printing off this booklet or your printer will stay on
this setting when you print off other documents.
Gathering Activity Idea #2
REMEMBER THE CAMPFIRE TOOLS
Materials: 13 to 15 campfire items, blanket, paper and pencils or pens. (Ideas for camping items are: A picture of a campfire, marshmallows, skewer, campfire skit book, a wooden log, a Dutch oven, oven mitt, a grill, a camping cup, paper plates, knife, fork, spoon, pocket knife, Kindling, seasonings, kettle, tongs, campfire claw, small shovel, hotdogs, spatula, Joke book, etc...
Instructions: Put the campfire items on a table and cover them with a blanket. Instruct everyone to lift the blanket for only 30 seconds. Then take a piece of paper & pencil and write down as many of the items as they can remember without lifting the blanket a second time.
Flag Ceremony Idea

What Are We Full Of?

What Are We Full Of?
Props: Six posters with the letters “C,” “H,” “E,”
“E,” and “R” (one on each poster), and one poster with the letters “FUL” on it
Seven Scouts hold up the posters as the Cubmaster
calls the letters.
Cubmaster: “Give me a C!
(A Scout holds up a poster, prompting the audience
to yell “C!”)
“Give me an H!
(The next poster goes up, etc.)
“Give me an E!
“Give me another E!
“Give me an R!
“What are we full of?”
“What are we full of?” (The audience yells “Cheer”
when the poster with “FUL” goes up.)
Cubmaster: Will the audience please join us in
saying the Pledge of Allegiance with Cheerful hearts.

Reindeer Pudding Snack
This idea would be fun and cheerful to do for the boys for either a Den or Pack Meeting dessert!
Materials: red marker, black marker, red pom poms, gold pipe cleaner, pudding cups, eyes.
Directions:
Pretty much just create what you see in the picture. So easy!

TP Roll Nativity Scene
(Google "TP Nativity" on Pinterest to see a variety of different sets.)
1) This craft would be great to do at a pack meeting. You have everyone sit at tables set up with the craft materials in the middle. The parents and their cub scout can each make 1-2 of the people to create a nativity set for their family to take home. Note: have them focus making Joseph, Mary and Baby Jesus First, just in case they do not finish in time. I like this idea because it helps the parents feel involved in their son's cub scout program.
2) Another idea would be to pre-
make a kit and put it in a Zip Lock bag for each cub scout to take home and
make their nativity set for a Family Activity some night. This would be a great Christmas gift. Be sure to include a picture of the finish
product in the zip lock bag. To print off a nativity
scene picture click here:https://drive.google.com/open?id=0B0revQcSgs4OWk1Za0ZDU0lSVlU
Materials:

Empty TP rolls or paper towel rolls, scrap fabric, pipe cleaners, scissors, glue gun, Elmer's Glue, bling jewels, ribbon, string of all kinds, fine tip black marker and anything else you want.
Directions:
Just be creative and have fun. I used a glue gun, but you could also use Elmer's Glue as well.

To make the manger, first cut the TP roll in half. Then with one of the halves, make a straight cut down the TP roll and fold in the sides for the legs. Then with the other half, cut it in half length-wise and glue one of the halves on top of the legs. I did not have straw, so I used some jute to outline the bed of the manger.
*Many of you asked me at round table where I got the white empty TP rolls. It is from Scott's Toilet Paper.

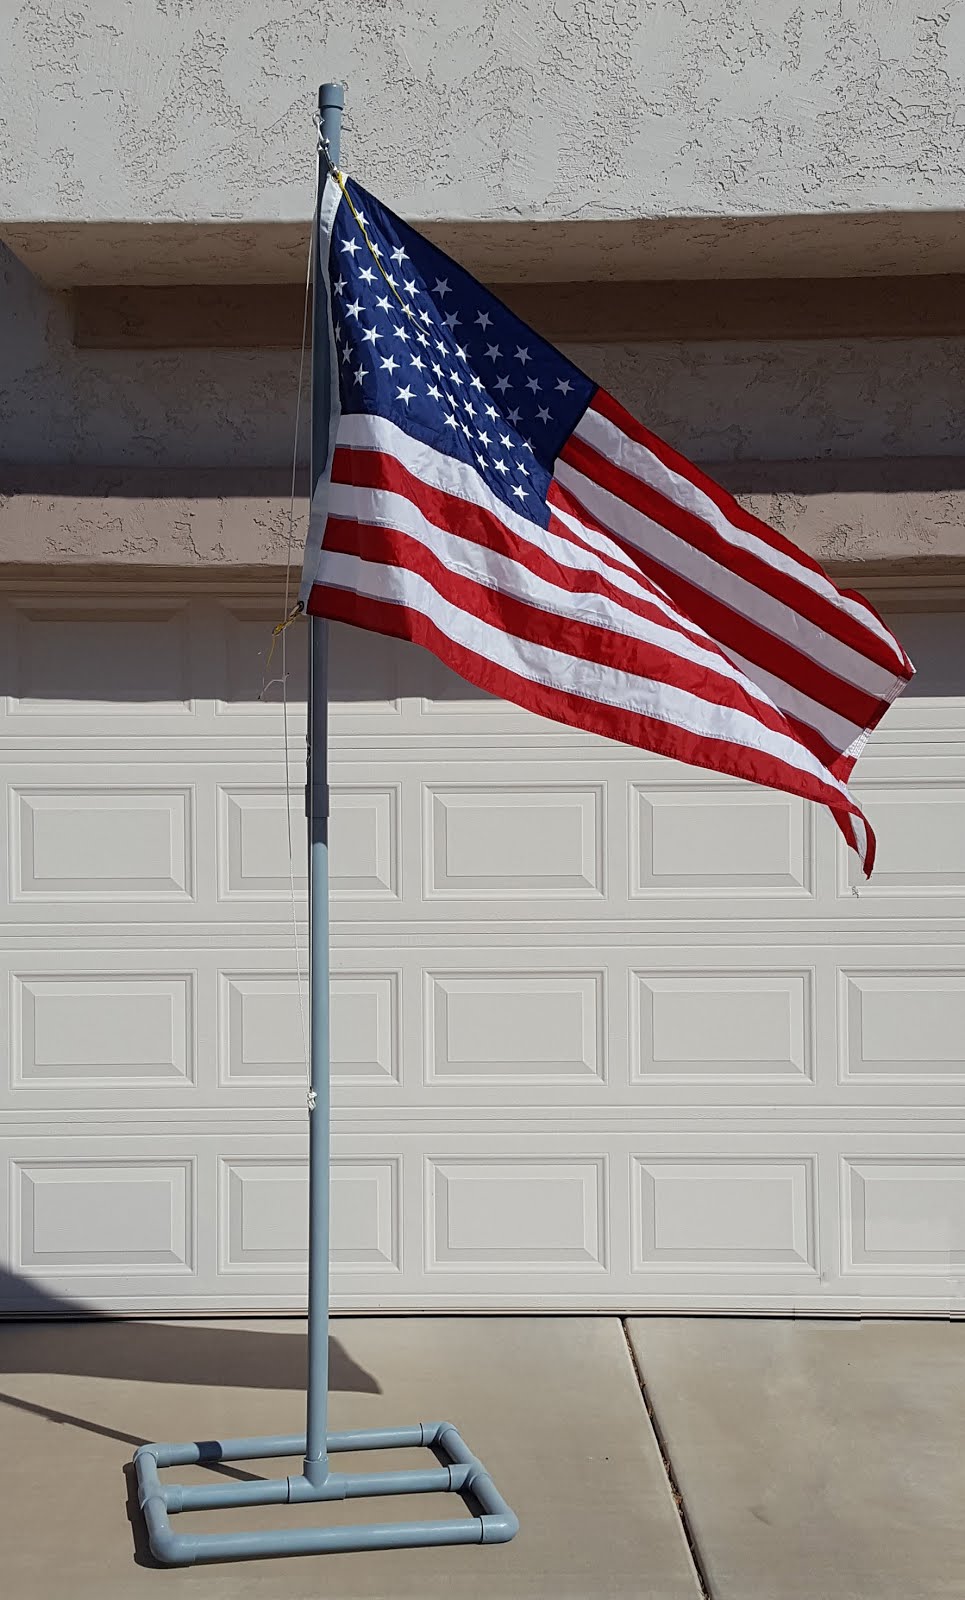
PVC Outdoor Flag Pole
With this Flag pole, you GET to choose your own location for an outdoor flag ceremony!

Materials: (In the picture above it shows the PVC pipe cut after bought at the store. In this list, I am telling you what to buy at the store.) 3 of 10ft 1-1/4" PVC poles, 3 of 1-1/4" PVC Tee Connectors, 4 of 1-1/4" PVC Elbows, 1 of 1-1/4" PVC cap, 1 of 1-1/4" PVC Coupler, PVC 1 - 1/4" All-Purpose Ratcheting Cutter (You could also use a miter saw - but the saw gets lots of plastic shavings all over the place. Make sure you vacuum and wipe off the PVC pipe before gluing/cementing.), Sledge Hammer, Drill, PVC Primer & PVC Regular Clear Cement, 1 to 2 gray spray paint cans, 2 of 1/2" Rigid Eye Bolt Snap, 2 of 1/2" Rope Cleat, 1 of 1/4"by 4" Eye Bolt with Nut, Black Marker, Phillips Screw Driver, Measuring tape and American Flag.
Directions:

1) Using the All-Purpose Ratcheting Cutter, cut one of the 10ft PVC pipes into two 4-1/2 feet long poles. With the other 10ft PVC pipe, cut 2 pieces at 24" and 6 pieces at 11".

MARKING THE DRILLING HOLES FOR THE EYE SCREW & THE 2 ROPE CLEATS.
Note: You will be using two Rope Cleats. One is for the Cub Scouts so they can reach it on the BOTTOM HALF of the flag pole when in use. The other one is on the TOP HALF of the flag pole for wrapping the rope around when storing.
2) Choose one of 4.5 ft poles and designate it the TOP HALF of the flag pole. Place a dot 2" from one end for the Rigid Eye Bolt. (This will be the top end.) From the bottom end, temporarily place a rope cleat approximately 4 inches from the end. Make sure it is in-line with the first dot you made at the top end. Use a black marker to put dots in the screw holes.
3) Take the BOTTOM HALF of the flag pole and temporarily place a rope cleat 24" from one end. Using a black marker, mark the screw holes for the rope cleat.

4) Find a drill bit for the 4" Rigid Eye Bolt. Then drill your hole in the PVC pipe. The hole should be big enough to allow the eye screw to pass through. When you put the Rigid Eye Bolt through later, it will be secured on the opposite side with a bolt. (This is the hole that is 2" from the top end of the TOP HALF of the pole.)

5) Find a drill bit that is the right size to drill pilot holes for the rope cleat screws. This bit should be small enough that when the screws are put in the PVC pipe they grab a hold of the PVC pipe securely. Drill the hole for both rope cleats.
Cementing PVC Pipe Together
THIS PART IS CHALLENGING AND NEEDS TO BE DONE QUICKLY AS THE PVC PRIMER AND CEMENT DRY VERY FAST. It took me four tries to get it somewhat right. So here are a couple of tips I learned. a) When cementing, GO FAST! b) Use a sledge hammer because it provides the weight necessary to pound the PVC connections together in one hit. c) Use LOTS of PVC Primer on both the inside and outside of the connections. Put it on first. Do not allow it to dry before you put the PVC Cement inside the connection because it will give you a second or two of extra drying time to position everything right. d) Use plastic trash bags to cover your floor. e) Do this on a LEVEL floor. (Some drive ways have a slant to them.) Unfortunately, I cannot guarantee a non-wobbly base. One of mine was perfectly flat and the other one wobbles slightly. But in the end, you are going to be outside using this flag pole and you will need rocks or bean/sand bags to hold it in place anyway; especially if it is windy.

6) Prime and cement one PVC Elbow onto one of the 24" pipes. Use sledge hammer to pound in place. Then quickly Prime and cement the 2nd elbow and slide it on the end matching the direction of the first elbow as much as possible by 'eyeing it.' Then place it on the floor and push the elbow in exactly the right place.(You want to do this before using sledge hammer, because it is hard to twist once you have pounded the pieces together.) Then quickly stand it up and take sledge hammer and pound once. This might cause the elbows to be slightly ajar, so place it back on the floor and stand; maybe jump, on both elbows at once, applying body weight.
7) Repeat for the 2nd 24" pipe and elbows.


8) Prime and cement ONE 11" PVC pipe AT A TIME to the PVC Tee using the sledge hammer to pound the connection together each time. Do this for 2nd PVC Tee.

For this one, make sure you have one of the long 4.5 foot poles nearby. You will need it to move the 3rd PVC Tee in the right direction once it is pounded into place. Also make sure you have a door or something nearby that you can use to help you 'eyeball' the pole position to make sure it is standing up straight.
9)Taking one of the Tee PVC Sections (with the 11" pipes extending from the a PVC Tee), apply primer and cement to the last PVC Tee that you have not used yet, and the 11" PVC pipe that is extending from a Tee. (Remember to use lots of primer to give you those extra two seconds!) Pound in place and quickly take the long pole and place it in the top of the PVC TEE. Use the long pole as a leverage to move the PVC Tee in place so it is at 90 degrees. Stand back and look at the long pole against the door or straight edge you choose earlier and make sure it is at 90 degrees. If not, twist the PVC Tee using the long pole as leverage to where it needs to be. You probably can only do this twice before the cement dries. So move quickly.

10) Prime and cement the other PVC Tee Section to the middle PVC Tee. Stand, maybe jump on all the PVC poles to help everything position right.

11) Prime and cement one of the poles with elbows, pounding on both ends and then standing on both elbows at the same time on a level floor. Repeat with the 2nd pole with elbows.

12) Prime and cement the cap on the TOP HALF of the flag pole. Make sure it is by the 4" Rigid Eye Bolt.
13) Then prime and cement the coupler on the bottom end of the TOP Half of the flag pole.

14) Lightly sand the whole flag pole except where the long poles are inserted. These areas need to stay smooth.

15) Put the whole flag pole together before painting. You want to make sure you do not paint the ends of the long poles where they are inserted into a connection.

16) After the paint dries, screw in the rope cleats. (The cleat on the bottom pole is used when you have a flag ceremony. the cleat on the top pole is used when storing the poles in your garage or elsewhere). Be sure to line up the rope cleat on the top pole with your Eye Bolt hole.
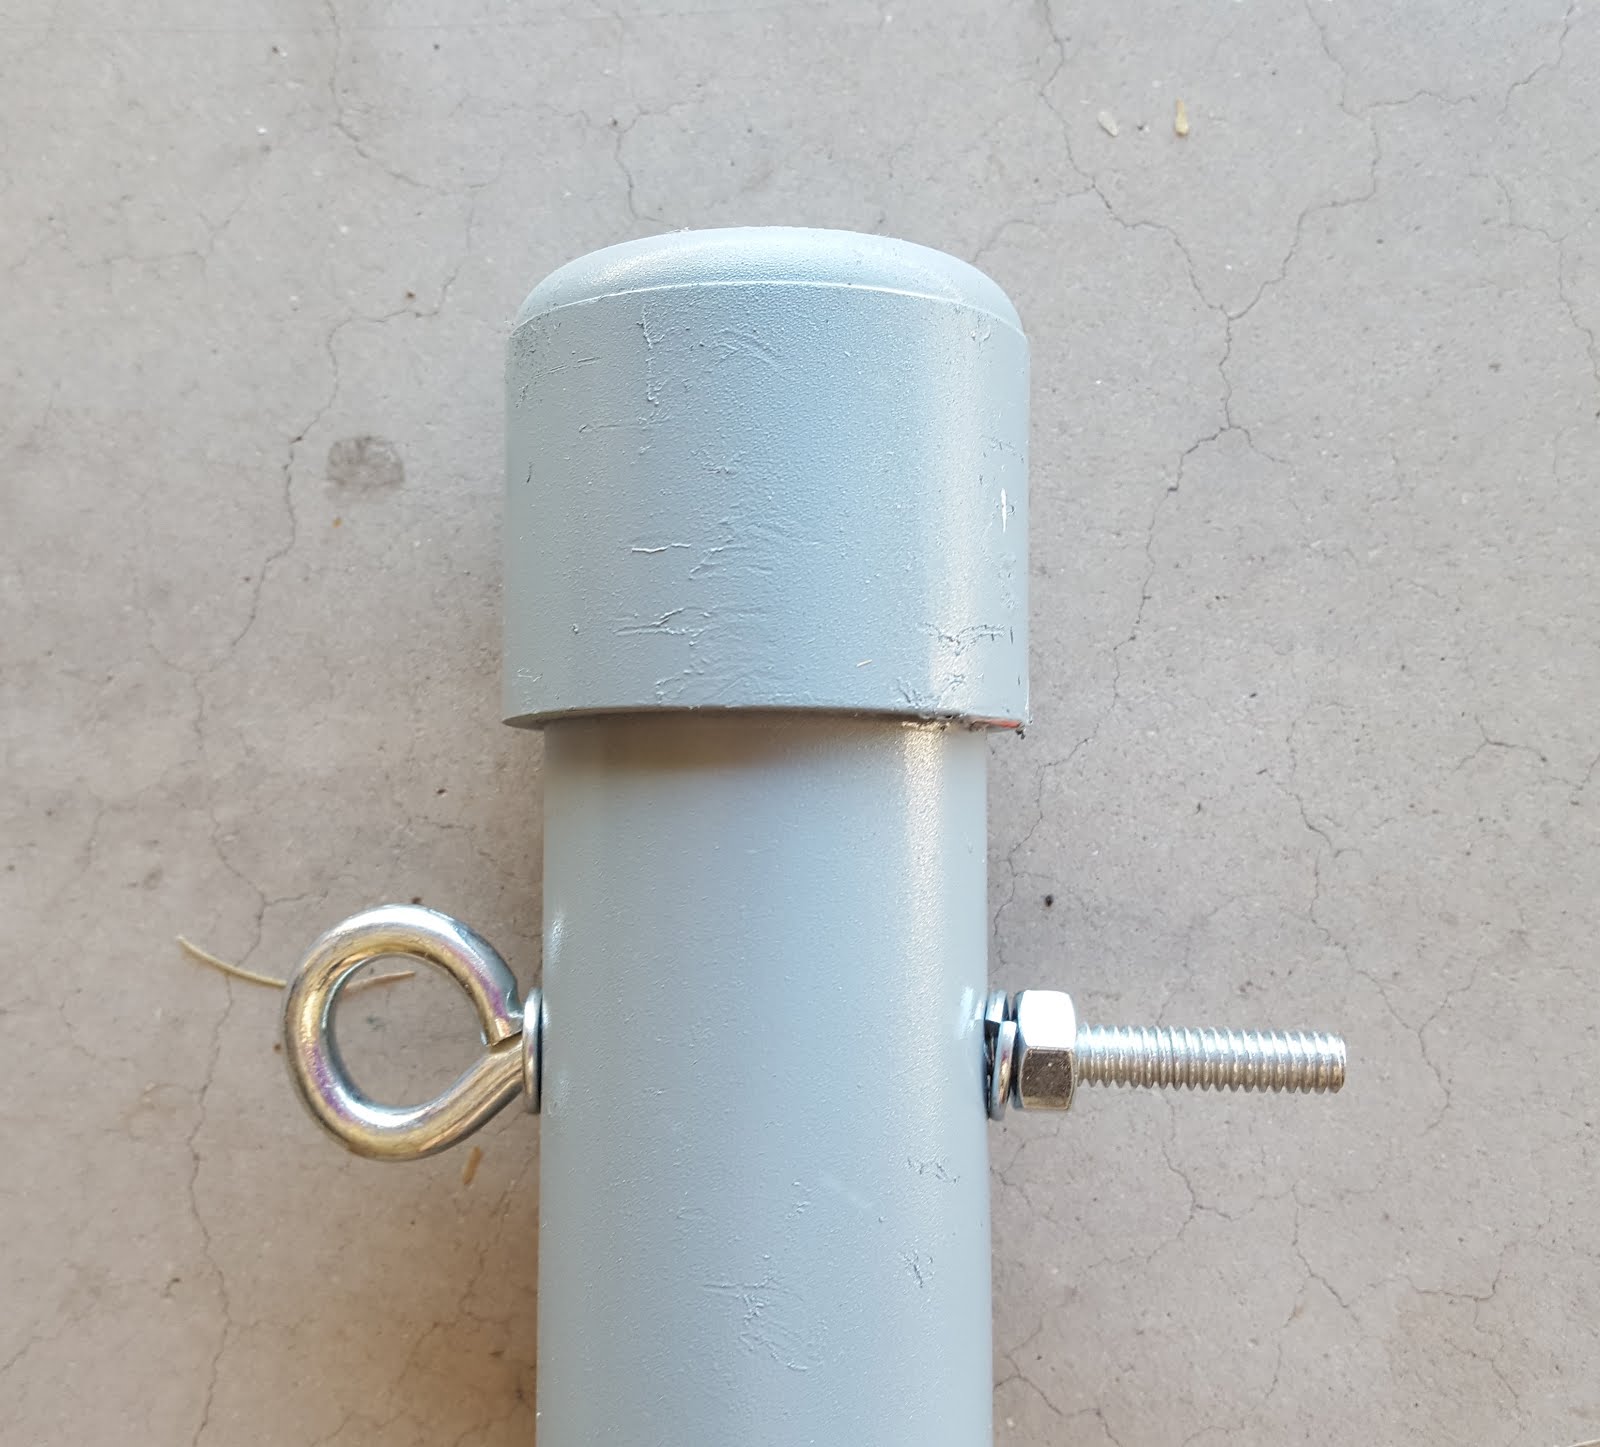
17) Then screw in the eye bolt in the hole you made at the top for it.
18) CUTTING YOUR ROPE: Take your 1/8 inch nylon rope and cut a piece that is 185 1/2 inches long.

19) Melt the ends of the rope to
keep it from fraying.

20) Measure from one end 9 inches and mark it with painter's tape. Then measure 47 inches from the same end and mark that with painter's tape.

21) Thread the end that is closest to the painter's tape markers through the Eye Bolt.

22) With a bow Line Hitch, tie on one of the Rigid Eye Bolt Snaps at the 47 inch 'blue painter's tape maker'. Then repeat with the second Rigid Eye Bolt Snap at the 9 inch 'blue painter's tape marker'.

23) Tie both ends of the nylon rope together using a Bow Line Hitch.

24) The extra rope can be wound
around the rope cleat.
25) When you are ready to have your outdoor flag ceremony, hook your flag on using the Rigid Eye Bolt Snaps.
26) Optional, but a good idea. Make some bean bags to place on the bottom of
the flag pole to keep it from blowing over if there is a lot of wind where you
choose to hold your flag ceremony. You
could also use some rocks to hold it in place if you are out in the wilderness.
Audience Participation
Activity
Favorite Camping Memory
Favorite Camping Memory
Have everyone turn to their neighbor and
share a favorite camping memory. Then take a bouncy ball and throw it onto the floor so that it bounces into the audience. The person who catches the ball gets to share
the story his/her neighbor told them. Then that person throws the ball to
someone else. Have the ball thrown about
4 times.
Cubmaster Minute - The Christmas Scout
Cubmaster Minute - The Christmas Scout
Many of you asked me at the round table where I got the story of the Christmas Scout. Here is the link:http://www.boyscouttrail.com/content/story/story-1.asp
Cheers
/ Run-ons
Marshmallow Cheer: Pretend to put a marshmallow on the end of a roasting stick. Then cook it over a campfire. Pretend the marshmallow caught on fire by saying "Whoosh!" Oh No!" Blow it out and take it off your roasting stick. Then put it in your mouth and say, "Delicious." like your mouth is full.
Marshmallow Cheer: Pretend to put a marshmallow on the end of a roasting stick. Then cook it over a campfire. Pretend the marshmallow caught on fire by saying "Whoosh!" Oh No!" Blow it out and take it off your roasting stick. Then put it in your mouth and say, "Delicious." like your mouth is full.
Santa
Claus Cheer: Reach out and hold
stomach saying loudly, "HO, HO, HO, Merry Christmas."


